One of the quirks of my love of cooking is my absolute obsession with learning to make things from scratch that most of the people I know don't even realize can be made in a tiny apartment kitchen. I started canning fruit jam while living in an apartment with literally 18 square inches of usable counter space. I make hand-dipped truffles that rival (in taste, though I'm still working on appearance) the candies you'd pay obscene amounts of money for in a boutique chocolate shop. If something is supposed to be far too much trouble or too difficult to make at home, then I want to make it.
My latest obsession? Marshmallows.
That's right. Homemade marshmallows. Light, fluffy, wonderful marshmallows. Marshmallows so good you'll wonder why you ever ate those boring, flavorless lumps of stale fluff from the grocery store.
They're nowhere near as difficult as you think. As a matter of fact, with a few tools, a decent stand mixer, and a little patience; you could whip up a batch in the afternoon and have fresh marshmallows after dinner.
The flavor possibilities are nearly endless. My first batch was simple vanilla. Vanilla doesn't get nearly the credit it deserves. I've already promised my darling wife mango and peach marshmallows for my next two batches. This time, however, I'm going with strawberry.
The ingredients are rather simple.
4 envelopes unflavored gelatin
1/2 C strawberry puree
1 1/4 C water
3 C sugar
1 1/4 C light corn syrup
1/4 tsp salt
1/2 tsp orange blossom water
1/2 C confectioner's sugar
1/2 C cornstarch

For marshmallows, frozen strawberries actually work better than fresh. I've got a big bag of frozen, whole strawberries in the freezer for smoothies. Because they've been frozen and thus had some of their cell walls punctured by ice crystals, they puree much more quickly and evenly than fresh fruit would. Also, it's January and I'm in Oregon. Fresh strawberries are hard to get, and not very good even if you do manage it.
First, get your hardware ready. Theoretically, it's possible to make marshmallows with an old-style mixer with two beaters (I don't recommend it. If you try it, you'll likely have to double your beating time), but a single whisk attachment will do a much better job. A Kitchenaid would be best, but I don't have one. I have a Hamilton Beach Eclectrics mixer, which I adore.

She's a little beat up from years of hard use, but she's never let me down. All the power of a Kitchenaid Classic for half the price. One day I'll upgrade to a Kitchenaid Pro and pass her along to someone who can appreciate her. Until then, she's my little workhorse.
See the splatter guard and pour shield on the bowl? You want one of those on your mixer for this recipe. Trust me.
This is also a good time to prep your pans. Line a half-sheet pan with tin foil, and give it a light coating of oil or non-stick spray. Then mix together the confectioner's sugar and cornstarch and sift an even coating over the bottom and sides of your pan. I find that metal pans do best with the foil lining, but glass pans don't need it at all. I wound up putting the last bit that wouldn't fit in my half sheet pan in a hastily prepared (spray and powder, but no foil) 8x8 Pyrex cake pan, and the slab came out beautifully with nothing more than a slight tug to loosen one side.
Next, it's time to puree the strawberries. I used a mini food processor, and it's much easier to get them nice and smooth if you puree the berries with 1/2 cup of the water and the orange blossom water. The orange blossom water is optional, and your marshmallows will turn out just fine without it, though it's not hard to find if you live in a city large enough to have a middle eastern market. If you can get it, the slight floral note on top of the berries adds quite a bit to the flavor.

In the mixer bowl, sprinkle the gelatin over the liquids and gently mix. Let the gelatin bloom while you make the sugar syrup.
In a large, heavy saucepan, combine the sugar, corn syrup, the remaining 3/4 cup of water, and the salt. My kitchen is short on saucepans that are large enough for this, so I used a dutch oven. You don't need a pot quite this large, but a little too big is far better than a little too small. The sugar will expand quite a bit while it's boiling, and the last thing you want is sugar napalm all over your feet because your pan was too small and boiled over.

Bring the sugar mixture to a boil. Once the sugar is completely dissolved, clip on a candy thermometer. The sugar needs to reach the soft ball stage (237 F). As soon as it gets there, get the sugar off the heat.
By this time, your gelatin should be finished blooming. If you pick up your mixer bowl and swirl it around, the gelatin won't move. At all. In fact, to demonstrate this fact, I held the bowl up perpendicular to the floor to take a picture.

With your pour shield in place, turn your mixer on the lowest speed and slowly pour the hot sugar syrup down the side of the bowl. Once the sugar syrup is all incorporated into the gelatin, crank the speed up to high, and let it go. You're going to be mixing on high speed for around 10 minutes.
Please, for the love of all that's holy, use your splatter guard!

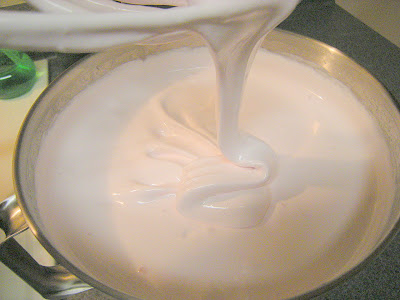
After a few minutes, you'll see that the color is quite a bit lighter, and it's starting to thicken. You're not done mixing yet.

At around 9 minutes (give or take), you'll need to start watching pretty closely. There's not much danger in over beating the marshmallow fluff, there is a danger of burning out your mixer's motor or making a very large mess. My girl was generating some heat by the end, and the bowl was about ready to overflow. The fluff will continue to expand as you continue to whip it. Eventually, it would reach the limit of the amount of air it could incorporate, but my mixer bowl isn't anywhere near large enough to take it to that point. More whipping means softer, fluffier marshmallows. If you get too much air in the fluff, you'll lose some of that nice, pillowy marshmallow texture.

When you're all done whipping your fluff, it will look something like this:
Oiling a spatula will make the pouring and spreading easier. Pour the fluff into your prepared pan(s) and spread it out as smoothly as possible. Then, sift a layer of your sugar/cornstarch mixture over the top.


Let the marshmallows cool and set for at least ten hours. A few extra hours certainly won't hurt them. I left these until the next evening.
When you're ready to cut, figure out where you're going to put the cut marshmallows, and get your sugar/cornstarch mixture ready. I like to use a big plastic mixing bowl with a tight-fitting lid. Cover the bottom of the bowl with your cornstarch mixture, and just toss the marshmallows in the bowl as you cut. When you get enough in the bowl that they start to stick together, put the lid on and give it a shake. Sift on more of the cornstarch mixture as needed.
Turn your marshmallow slab out onto a safe cutting surface and dust with a bit more of the cornstarch mix if there are any sticky spots.

Cut into small squares with a pizza wheel or whatever works best for you. If your pizza wheel is too small to go all the way through the slab, a bench scraper works well, too.

Once the marshmallows are all cut and coated in the the sugar/cornstarch, shake off the excess powder and store in an airtight container. They also freeze very well.
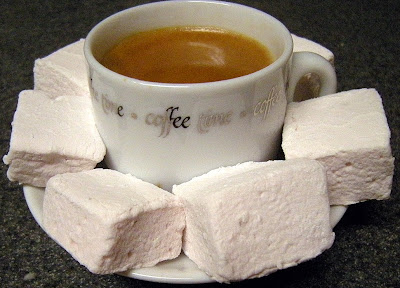
Of course you can serve these with hot chocolate, but I like mine with a nice shot of espresso.
Blogged with Flock